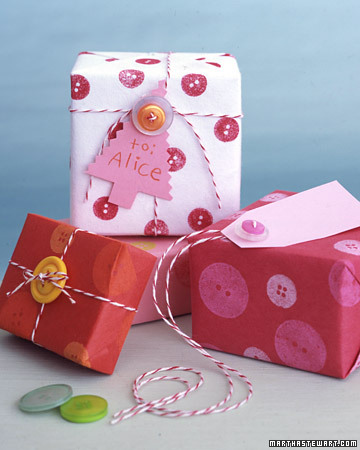
e-mails cindyramirezmurga@hotmail.com O cindy.ramirez@losolivos.edu.gt
 
ATENCION: La publicidad de esta página es ajena a mi, proviene del servidor. Disculpe los inconvenientes.
Home
Vacation time
Imágenes de Recyclart
Christmas!!!
=> christmas pictures
=> Christmas coloring pages
=> Christmas projects
Deja tu mensaje
Fathers day
Games
Mothers day!
Class rules
INFO 2010
Videos Disney
Science
Reading
Spelling
Computación
Grammar
DNealian Handwriting
Music links!
Look at this!
Be my Valentine
English fair 2008
English fair 2009
1rst grade 2008
1st Grade 2009
 

Most of the pictures are taken from internet, if there is any problem please let me know so they can be taken away from this site. Thanks. La mayoría de imágenes son de internet, si hay problema con su publicación notificarme y serán quitadas de este sitio. La publicidad de esta página es ajena a mi, proviene del servidor. Disculpe los inconvenientes.

Christmas projects


Materials
  • Tempera paint and paintbrushes
  • 1 toilet paper tube
  • 1 paper towel tube, cut into two different lengths
  • Colored paper (for faces and mittens)
  • Black marker and pink pencil
  • Glue
  • Sheet music (from a songbook or gift wrap)
  • 3 child's socks
  • String or raffia
  •  
Instructions
  1. Paint the tubes and set them aside to dry. From the colored paper, cut out oval face shapes and draw on eyes and mouths with the marker. Use the pink pencil to color rosy cheeks. Cut out paper mittens for each caroler too.

  2. From the sheet music, trim two small rectangles and fold each in half to resemble a mini songbook. Glue the faces onto the tubes. Then glue a songbook between each pair of mittens and glue the mittens to the tubes.

  3. For hats, trim the feet off the socks and discard them. Fold an end of each sock tube into a cuff and stretch it onto a caroler's head. Tie the hat closed with string or raffia.

    TAKEN FROM

    http://familyfun.go.com/crafts/christmas-choir-661390/


    Materials Needed for your Claypot Nativity

    You will need: 2 mini clay pots (2"), 2 large wooden beads, 1 small wooden bead, Clay saucer, straw or moss, a small bit of string, strips of fabric/felt, and tacky glue. Scrap of white fabric or paper.Craft Paints in flesh color and pink, dark brown. Permanent marker for details on face.

    Instructions

    Paint the clay saucer a dark color for the base of your Nativity.

    Paint wooden beads (or doll heads) flesh color. Dab pink for cheeks. (You can also use blush instead of paint)

    Once the glue is dry, Turn two pots upside down and glue a bead on top of each one, (representing Mary and Joseph).

    Add facial details. Simple lines will create a peaceful face. (see photo)

    Place straw folded over, (represents the manger). Place the third bead (represents Jesus' head) into the straw wrapped with white felt (or paper).

            taken from http://www.holiday-kids-crafts.com/christian-christmas-crafts.html


    button wreath Christmas Craft Project   Button Wreath Handmade Ornament


    Create a simple and creative Christmas wreath using buttons. You can use theme colored buttons to create wonderful little button wreaths. This is also a fun and easy craft project for kids to do as well because each button wreath they make will be unique. You could make smaller wreaths for gift packages, holiday favors and place settings, or even napkin ring holders.

    What You will Need:
    22 Gauge Green Floral Wire
    Assorted Buttons of your choice
    Scissors
    Ribbon of your choice

    Instructions:
    1. First, take your scissors and cut about 9″ or 10″ in length from your green floral wire . Form the green floral wire into a U-shape and make a small loop at one end of the green floral wire .
    2. Begin threading your buttons onto the U-shaped green floral wire form. Continue threading your buttons on the form until you form the size of wreath you want.
    3. Once you are finished threading the buttons on the wire form. Take the end of the wire and twist it around the looped end of the wire, securing on the buttons on the wire.
    3. With the ribbon of your choice, thread through the loop you created on the wire to create a hanger for your button wreath. Finally, tie a ribbon bow above the button wreath and you have now finished your wreath!


    Kids Can Make Cardboard Angel Ornaments as Gifts, Angela Krueger

    Made from clothespins, cardboard, pinecones and scrap materials these angel crafts are perfect for Christmas tree ornaments and make cute one-of-a-kind holiday gifts.


    Button Gift Wrap


    With simple household materials and recycled items, kids can make their own gift wrap, boxes, and gift tags for the holidays.

    Kids will wow friends and family with this button-stamped gift wrap. Affix button to a cork with double-sided tape. Place plain paper on a piece of felt or a folded piece of fabric (this cushions the paper so the mark will be even). Top with a pretty button tied on with baker's twine.

    Read more at Marthastewart.com: Kids


    This coffee filter angel craft is very easy to make, yet it looks very impressive. This craft is easy enough for most children to make, all by themselves. She will look very elegant hanging as an ornament on your Christmas tree. These are hot sellers at craft fairs, and they are inexpensive to make. The Styrofoam cones and balls, and the gold rings, are usually sold in multi-packs. This makes it cheaper to make several angels than just one, perfect for Sunday school projects. This angel would make a wonderful gift! If you would like to see another craft project using coffee filters, be sure to check out the coffee filter butterfly!

    Things Needed:

    1. 3 white pleated coffee filters
    2. One 3.5 inch Styrofoam cone
    3. One 1 inch Styrofoam ball
    4. One toothpick
    5. One gold ring (these are found in craft stores, in the aisle for making wedding favors)
    6. Gold ribbon
    7. White thread
    8. Hot glue gun, or use a pin (hot glue may want to be avoided if this is a children’s project) 

    9. taken from  http://christmasdecorationcrafts.com/Angel_Ornaments.html


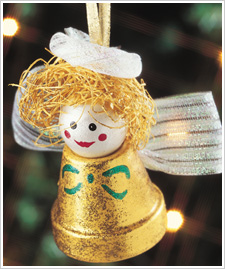
    Paint clay pot (angel’s body) Inca Gold. Paint ball knob (angel’s head) Pearl White. Dip end of brush in Sequin Black to make eyes and Bright Red to make cheeks. Use paint brush to paint mouth in Bright red. Highlight eyes with Pearl White. Pull out enough excelsior to form angel hair. Paint excelsior with Inca Gold. Let dry.

    With green permanent marker, draw bow on angel body (see photo for placement). Cover with Real Green Sparkles.

    Brush Pure Gold Sparkles over clay pot. Use more than one coat for more sparkles.

    Make a loop of gold ribbon, knotting bead or button inside of pot to hold it securely. Bring loop out through hole on the top of the pot to use as a hanger.

    Glue hair to head. Let dry. Highlight hair with Pure Gold Sparkles.

    Cut 6” of wired ribbon, fold ends into the center to form wings. Glue to the back of the clay pot. Roll remaining ribbon lengthwise around a pencil. Form into a circle and glue head for halo.

    taken from http://christmasdecorationcrafts.com/Angel_Ornaments.html


    "Puzzle Wreath Ornament"

    Submitted by Christy Foley of VA

     
    I made this ornament with the kids in my class when I used to work in daycare. We had a ton of old puzzles that had missing pieces, so we used the pieces to make these cute wreaths.  We glued them into the shapes we liked, then painted them green.  Then using glue we made dots and sprinkled on red glitter.

    taken from http://www.betterbudgeting.com/christmasornaments08/puzzlewreathornament.htm


Tú eres el 77805 visitantes (209240 clics a subpáginas)
 
“Friends love, respect and help each other”.
"Los amigos se aman, respetan y ayudan unos a otros".
 
Blessings come in different ways, the nicest come in family and friends. Este sitio web fue creado de forma gratuita con PaginaWebGratis.es. ¿Quieres también tu sitio web propio?
Registrarse gratis